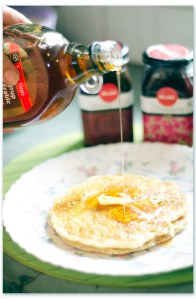
Maple Syrup = Pancakes
(well French Toast, Iced Tea, Fruit, Yoghurt are other ways to use maple, but pancakes are my favourite.). AK prefers waffles but I decided on pancakes for a change…
The recipe I use came out of an old Betty Crocker cookbook (on one of my frantic afternoons of copying recipes from Pakhi Masi’s library of cookbooks on to little scraps of paper!). If you try searching for her recipe on Google today, all the search results will give you recipes which use her pancake mix. Which sucks because, in India, the cost of one of those BC pancake mix boxes could actually buy me a nice brunch at American Diner!
Her original recipe says to dump all the ingredients in a bowl and beat with an electric mixer. Batter ready in 2 mins flat. (Well not in those exact words, but you get the gist). Over the years, I felt that my pancakes lacked the “fluffiness” which makes them so irresistable. So I stirred my method up a bit…
This recipe makes 7-8 pancakes, depending on the size of your ladle…
What you’ll need:
3 eggs
1 3/4 cup flour/maida
1/2 cup shortening (I just use Amul butter)
1 1/2 cup buttermilk (I used to use regular milk but not this time. Instructions below)
1/2 tsp salt
1 tsp baking soda
2 tsp baking powder
Here’s what you’ll need to do:
Get the buttermilk ready… Take a little more than 1 1/2 cups whole milk (little more because some will curdle and you’ll have to throw it out!). Milk should be at room temperature. Add 1 1/2 tbsp of freshly squeezed lemon juice to it and let it sit till you get the other ingredients ready. When you’re ready to roll, strain the liquid and discard the curdled part. It will look like this…
This step is important. I read recently that the combination of buttermilk (which is acidic) and baking soda causes a reaction which lets out lots of bubbles which, when compounded with the heat of the pan, swell more and result in fluffier pancakes.
Next, place all the dry ingredients in a sieve/ atta chhanni and sift them together 3 (yes THREE times. I learned this from baking cakes. This is important so that the baking soda, baking powder and salt mix very well with the flour and also brings in some air into the equation. This plays a role in the pancakes turning out fluffier.
In a mixing bowl, crack the eggs…
Using a whisk, beat the eggs until really nice and frothy. This step is also very important as the beating really adds air to the eggs and to the pancake batter as a whole (as you can tell, I’m all about being scientific today!).
Pour in the buttermilk…
Whisk well…
Take the butter and warm it a little so it soft and runny (but not totaally liquid) like this…
Pour it in and whisk well…
Add the dry ingredients…
Combine well…
Use an electric mixer for a minute or two to ensure that there are no lumps in the batter..
The batter should be of medium consistency, neither too thick nor too runny.
Now for the cooking… Heat a nonstick pan on medium heat. I usually use my non-stick dosa pan (which would displease my Father-in-Law no end, because the dosa pan is sacrosanct and MUST NOT be used for anything else!). Once the pan is nice and hot, take a ladle or tea-cup and pour the batter right in the centre of the pan…
(The pan doesn’t need any greasing as the batter has enough butter in it AND we’re using a non-stick pan)
Cook on medium heat till you see lots of bubbles on the surface and the sides are almost cooked. This means it’s time to fliiiiiiiiiiiiiip the pancakes (which can be quite fun with some practice, but I’m afraid I’m not an awesome pancake flipper yet. There’s time yet…!)
OK at this point, it’s very important that you don’t flip out… The first pancake of the batch is always browner than the other and doesn’t look as perfect. This does NOT mean that it’s burned, just that the bottom doesn’t LOOK perfect…
The second one, and all the subsequent ones, look evenly golden at the bottom, which is perfect! Depending on your stove and pan, you will be able to judge the time it takes for your pancakes, but for reference, mine took approx 3 mins each side…
Keep stacking them on a plate or serve as you go… I prefer to set my oven on warm setting and place the pancakes in a stack. I have 2 very good reasons – 1) I don’t want ANYONE digging into those yummy pancakes before me (yeah I’m pretty selfish); and 2) The stack looks more impressive when set on the table!
This is my stack, not yet complete…
When ready, serve on a plate with a nice pat of butter and maple syrup… Ummmmmmmmmm heaven on toast (ooops, on pancakes)!
But seriously, butter is the only definite topping, constant for all variations… You can use any combination of maple syrup, chocolate fudge, Nutella, fresh mangoes/berries/bananas, jam or fruit conserve or absolutely anything else that does it for you! In the absence of pure maple syrup, honey is a better alternative than cheap (supposedly American) pancake syrup that you can find in the market. This is simply thick sugar syrup (chaashni with 1-2% maple flavour)…
All in all, I found this pancake batch (using buttermilk and whisking all the ingredients in a logical order) to beat all the prior attempts hollow! Only afterthought was to reduce the amount of buttermilk to get a slightly thicker consistency, resulting in thicker pancakes… But there’s enough Sundays in the year to have another go!
Credits:
AK for the photographs
Abhi & Neha for tasting and making all the right sounds!


